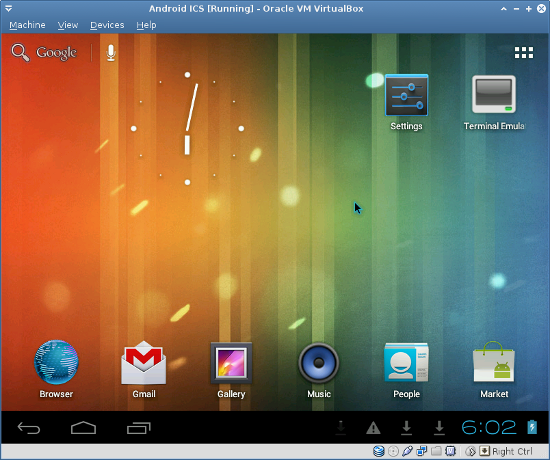
Android 4.0 in VirtualBox
This information is a little hard to find on the Internet. This is how to install Android 4.0 (Ice Cream Sandwich) in VirtualBox,
in a "do it yourself" way (installing from an ISO image). There are
some people who have made pre-installed VirtualBox images, but one
problem you may run into going that route is that the Android serial
number will match everybody else who's using the same image as you,
since Android generates this number on its first boot.
Getting an Android ISO
The folks at
Android-x86
have been making x86 builds of the Android OS for quite a while now,
and none of this would be possible without them. They have ISO images
for various versions of Android available, but most of them don't work
very well in VirtualBox. For example, their "eeepc" image for Android
4.0 has issues with the audio drivers and the network (it has no
Ethernet support built in, etc.)
So this means using one of the Android-x86 images from there won't get
you too far because audio and networking won't work. Fortunately,
somebody has put together an ISO image that's been custom tailored to
VirtualBox.
I don't remember where I found this ISO image; if it's yours, leave me a comment and I'll edit this post. 
I found the ISO here:
android-x86 VirtualBox/VMWare support (thanks @jakimfett!)
I have a copy of this ISO hosted here:
android-x86-vm-20120130.iso (244MB). This ISO works much better.
Create a Virtual Machine
In VirtualBox, create a new machine for Android.
- Machine Name: "Android ICS" (you can name it anything you want)
- Machine Type: "Linux 2.6"
- Memory: I gave my VM 1024MB of memory.
- Hard Disk: I created a new 16GB VDI image that dynamically expands.
All the default settings worked fine for me. Here's what the defaults were on my system:
- Networking:
- Type: NAT
- Adaptor: "Intel Pro/1000 MT Desktop (82540EM)"
- Audio: Intel AC'97
- Storage Layout:
- IDE Controller:
- SATA Controller:
Update: In the comments, @Ni mentions this:
Make sure you add the SATA Controller if it does not
appear, when you setup the virtual box and then add the ISO image and
virtual disk image to this.
If you try and add the ISO image and virtual disk image to the IDE Controller this will not work at.
This information maybe useful to someone making this mistake.
It worked for me as listed above (IDE CD drive, SATA hard disk), but
this is something to keep in mind if you have any issues booting the CD
or installing it to disk.
Installation
Make sure the VM boots from the ISO image.
- On the boot screen, select "Installation - Install Android-x86 to harddisk"
- Choose "Create/Modify Partitions". This takes you into
cfdisk.
- Choose "[New]"
- Choose "[Primary]"
- Press enter to accept the default partition size (mine was 17174.38)
- Choose "[Bootable]"
- Choose "[Write]"
- Type "yes" to confirm writing.
- Choose "[Quit]"
- Choose to install on the sda1 device (Linux VBOX HARDDISK)
- Choose to format the drive "ext3"
- Pick "Yes" to confirm formatting.
- Pick "Yes" when it asks to install the GRUB bootloader.
- Pick "Yes" when it asks to mount /system as read-write (this will be important later to install the Google apps).
- Create a fake SD card when it prompts. I made mine 2047MB (the maximum allowed).
- Choose "<Reboot>"
Make sure you detach the ISO image from the virtual machine so that it
will boot into the installed OS. If you see the "Installation" option
again, it means you're booting from the ISO still!
Tips for Running Android
You'll want to disable mouse integration to be able to interact with the
GUI at all. This can be done from choosing the "Machine" menu in the VM
window and clicking "Disable Mouse Integration" -- or pressing
HostKey+I.
The Escape key on your keyboard corresponds to the Back key in Android.
The context menu key on your keyboard corresponds to the Menu button in
Android (the context menu key is usually next to the right Windows key).
To power off the VM, press
HostKey+H.
This will cause Android to pop up the shutdown dialog that you'd expect
on a real phone. You can also use the "Machine->Send Shutdown
Signal" to do the same.
Install the Google Apps
You may notice that this Android VM doesn't include the Android Market,
GMail, or Google Maps. These are some of the Google Apps and due to some
licensing restrictions Android-x86 doesn't include them "out of the
box".
On a real Android device that's been rooted and flashed with a custom
ROM, you'd install the Google apps by flashing them in recovery mode.
But you can't get into recovery mode on VirtualBox. Thus, the method for
installing the Google Apps is kinda sketchy, but it works (and if you
know of a better way, feel free to tell me).
You'll need a file with a name like "gapps-ics-20120304-signed.zip".
These are the Google apps (the date part might be different). You can
Google them, but I have a copy of them here to download too.
You don't really need the entire Google Apps file, actually. Just the
"system" folder inside the zip file. Create a new tar file of the
"system" folder so that it will be easy to get it into your Android
device. I have a prepared "system.tar.gz" for you if you just want to
use mine.
The steps to install the Google Apps are as follows:
- Download system.tar.gz to your Android VM somehow. I used the Web
Browser app and downloaded it there. You could probably also use the
Email app, or if you're really Android savvy, push it with the Android
Debugger.
- If Android tells you that there is no SD card so it can't
download the Google Apps, that's because you skipped that step while
first installing your Android system. The very last step of the
installer asks if you'd like to create a virtual SD card partition, and
you should've had it do that. If you didn't, the only easy solution I
know of is to reinstall the OS.
- Open the "Terminal Emulator" app in Android.
- Enter these commands (note: don't type the $ or # symbols at the beginning of these lines. These symbols indicate the prompt.)
$ cd /sdcard/Download
$ tar -xzvf system.tar.gz
$ su
# cd /sdcard/Download
# cp -rf system/* /system/
Pay special attention to the cp -rf command. Make sure the slashes and *'s are in the right places.
- Reboot the phone.
You should now see the Market app, GMail and the others in your app menu.
Note: in my experience, the Market app will be somewhat
unstable. When you start the app, it will Force Quit after 10 or 15
seconds. However, if you're fast enough you should be able to quickly
search for a specific app you'd like and begin the download process
before Market crashes, and the app will continue to download and install
regardless.
I imagine that the unorthodox way of installing the Google Apps might be
partly to blame for the Market being unstable. The other Google apps
seem to work fine though.
Custom Screen Resolutions
This is a tip I discovered somewhere a while back for getting custom
resolutions to work in your Android VM (for example, to mimic the screen
dimensions of the Galaxy Nexus phone, or just to run the VM at a higher
resolution like 1024x768). I've found that you can use just about any
arbitrary resolution you want, but when the resolution isn't a standard
4:3 one (like 1024x768), the VM seems to get somewhat laggy.
The general steps are as follows. Substitute
1024x768 with
whatever resolution you want. You can add multiple video modes by
changing "CustomVideoMode1" to be "CustomVideoMode2", etc.
- In your Terminal or Command Prompt window on the host system, run this command:
VBoxManage setextradata "Android ICS" "CustomVideoMode1" "1024x768x32"
Substitute "Android ICS" with the name of your VM (but keep the quotes).
- Start your Android VM, and when you see the bootloader screen:
- Press the "e" key to edit the boot arguments
- Press "e" again to edit the kernel boot line
- Add
UVESA_MODE=1024x768 to the end of the boot arguments (make sure to hit Space first), and press Enter.
- Press "b" to boot.
There should theoretically be a way to edit the GRUB config file and add
more boot options that have the custom resolutions already configured,
but I'll leave that as an exercise for the reader.

No Warranty
Android is primarily an ARM architecture operating system and the x86
version isn't supported by Google. While a lot of apps will work in
Android-x86, some may crash in weird ways. If you're an Android
developer though, this can be pretty useful because Android-x86 will run
a lot faster on your hardware than the standard emulator from the SDK
does, so you can test your apps much more rapidly (the Android-x86 site
has some documentation on how to connect ADB to your virtual machine).
Your mileage may vary.
Updates
To answer common questions that come up in the comments...
- Adobe Flash, Netflix, others... -- these apps
won't work in Android-x86, because they aren't pure Java. They include C
code that's compiled for the ARM processor found in most Android
devices. They won't run on x86 processors.
- Apps that rotate your screen... -- apps that
force the orientation into portrait mode (thus turning your screen
sideways) can be dealt with by changing your VM's screen resolution to
be taller than it is wide (i.e. 800x1280). The app will recognize the
portrait resolution and not rotate. However, your VM may be laggy when
it's not in a standard 4:3 resolution. Alternatively, find an app that
forces/locks your orientation to one direction or another -- however,
some apps misbehave when forced to use the wrong resolution and may not
be usable.
- Don't expect a lot of apps to work -- for various reasons, apps that work on real Android devices may not function properly on Android-x86.
- Text messaging and phone calls won't work -- Your
virtual machine is not a phone. It doesn't have a cellular connection
to AT&T or Verizon or anybody. The standard texting apps like
Messaging and Handcent SMS are useless on an Android VM (this also goes
for most Android tablets that don't have cell connections). If you want to text from your VM, you might try using the Tablet Talk app, connect it with your actual cell phone, and text through that app. If you want
to make phone calls, you might have luck with a Voice over IP app --
however, I can't guarantee your microphone and such will work with the
VM, as I haven't tested it.
I'll update the list above as more common questions come in from the comments below.
تحميل برنامج فيرتوال بوكس من هنا
تحميل نسخة الايزو لنظام اندرويد 4 من هنا
المصدر من هنا
رابط نسخ متعددة للاندرويد من هنا
لمزيد من المعلومات يمكنكم مراسلتنا بريدياً على الايميل التالي:
kinansyria@mail.com